AWS Introduction
Amazon Web Service
Amazon provides web-service based access to its infrastructure via two separate but interoperating facilities:
- Elastic Compute Cloud (EC2) – virtual machines, network, block storage, identity management
- Simple storage service (S3) – scalable, eventually consistent object storageIn addition, it also offers a number of higher level services that make use of this infrastructure, such as
- NoSQL database: DynamoDB
- SQL database: RDS
- Data warehousing: Redshift
- In-memory object caching: Elasticache
- Archival storage: Glacier
- Network overlays: VPC
- Authoritative DNS: Route53
- Web caching and CDN: CloudFront
- Hadoop: Elastic Map Reduce
- Data stream processing: Kinesis
- Streaming app support: AppStream
- Search: CloudSearch
- Workflow: SWF
- Bulk email: SES
- Alerting: SNS
- Reliable queuing: SQS
- Media transcoding: ElasticTranscoder
- Performance monitoring: CloudWatch
- Web containers: ElasticBeanstalk
- Image templating: Cloud Formation
- Application configuration and deployment: OpsWorks
- Secure key management: CloudHSM
- logging and auditing: CloudTrail
- Docker: Container Registry and ServiceAll services are accessible via SOAP, REST, command-line tools (Java), SDKs (Java, PHP, .Net, Python, Ruby, iOS, Android) graphical AWS console.
Resource Pools
AWS implements a pooling model in which resources are partitioned into separate groups, more or less in a hierarchy. Only S3 is global to the entire cloud although the credentials are valid for all AWS services no matter which pool they are in.
The top level designator for AWS is the region. Each region implements its own namespace. Thus names of cloud objects in one region are not valid in the others. Alternatively, objects that are replicated among regions (e.g. images) have different names.
The current set of regions are:
- ap-northeast-1 – Asia Pacific (Tokyo) Region
- ap-northeast-2 – Asia Pacific (Seoul) Region
- ap-southeast-1 – Asia Pacific (Singapore) Region
- ap-southeast-2 – Asia Pacific (Sydney) Region
- ap-south-1 – Asia Pacific (Mumbai) Region
- ca-central-1 – Canada (Central) Region
- eu-central-1 – EU (Frankfurt) Region
- eu-west-1 – EU (Ireland) Region
- eu-west-2 – EU (London) Region
- sa-east-1 – South America (Sao Paulo) Region
- us-east-1 – US East (Northern Virginia) Region
- us-east-2 – US East (Ohio) Region
- us-west-1 – US West (Northern California) Region
- us-west-2 – US West (Oregon) RegionEach region contains several availability zones. Resources in separate availability zones should be characterized by independent failure probabilities. For example, a VM running in us-west-2a and one running in us-west-2b should be isolated from each other with respect to datacenter infrastructure failures (e.g. power outtages, network failures, disk failures, etc.)
Interacting with AWS
Amazon’s preferred method of AWS access is through the AWS console. However doing so makes it difficult to control AWS programatically. Each command has a documented REST and SOAP interface. The service documentation contains a link for each service that itself links the API reference. For example, the EC2 documentation is described here.
Perhaps the most straight forward way to access AWS, however, is through the CLI. AWS consists of many simple primitives rather than a few complex ones. This design choice promotes both performance and robustness in a distributed setting since the coordinated functionality of each primitive is minimized. It makes using AWS tedious, at times, however because many different primitives may be necessary to accomplish a single task. Put another way, the AWS API is designed for scalability more than it is designed for convenience and/or ease-of-use.
The CLI can be accessed, essentially, in two ways that are (more or less) differentiated by the way in which AWS security credentials are checked. Amazon makes available CLI tools that are written in Java and use SOAP. These tools use X.509 certificates to authenticate each request. AWS also supports a number of SDKs (for different languages) that use a secret key to sign REST requests. Euca2ools is a set of wrappers around the Boto SDK for Python that mimics the AWS CLI commands. I’ll use euca2ools in what follows but the syntax should be the same for Amazon’s ec2 tools.
euca2ools requires access to your AWS credentials which are
- an X.509 certificate
- an X.509 private key
- an AWS access key
- an AWS secret keyIt also requires endpoints (URLs) for the tools to contact for different services. Most of the commands allow you to specify these on the command line, but the typical approach is to set them as environment variables.
WARNING: You must protect your credentials. If they are stolen or made visible, they provide access to your AWS account.
Here is a sample set of exports for bash that set some of the relevant environment variable. You can source this file in bash and that shell will be able to run euca2ools against AWS.
export REGION=us-west-2
EUCA_KEY_DIR=$(cd $(dirname ${BASH_SOURCE:-$0}); pwd -P)
export EC2_URL=http://ec2.$REGION.amazonaws.com
export S3_URL=http://s3.amazonaws.com
export TOKEN_URL=http://storagegateway.$REGION.amazonaws.com
export AWS_AUTO_SCALING_URL=http://autoscaling.$REGION.amazonaws.com
export AWS_CLOUDWATCH_URL=http://monitoring.$REGION.amazonaws.com
export AWS_ELB_URL=http://elasticloadbalancing.$REGION.amazonaws.com
export
EC2_PRIVATE_KEY=${EUCA_KEY_DIR}/XXXXXXXX.pem.txt
export
EC2_CERT=${EUCA_KEY_DIR}/YYYYYYYY.pem.txt
export EC2_ACCOUNT_NUMBER='NNNNNNNN'
export EC2_ACCESS_KEY='PPPPPPPP'
export EC2_SECRET_KEY='SSSSSSSS'
export AWS_ACCESS_KEY='PPPPPPPP'
export AWS_SECRET_KEY='SSSSSSSS'
export AWS_CREDENTIAL_FILE=${EUCA_KEY_DIR}/iamrc
export EC2_USER_ID='UUUUUUUU'
You’ll need to fill in the strings that are repeated capital letters with the various keys and key files, and cert files, user ID and account number for your account. This information can be obtained from the AWS Management console.
EC2
Amazon’s EC2 provides essentially three functionalities:
- virtual machine provisioning
- network provisioning (including firewalls)
- block storage provisioning (persistent volumes)We’ll cover each and then describe how they are managed using euca2ools using the following figure:
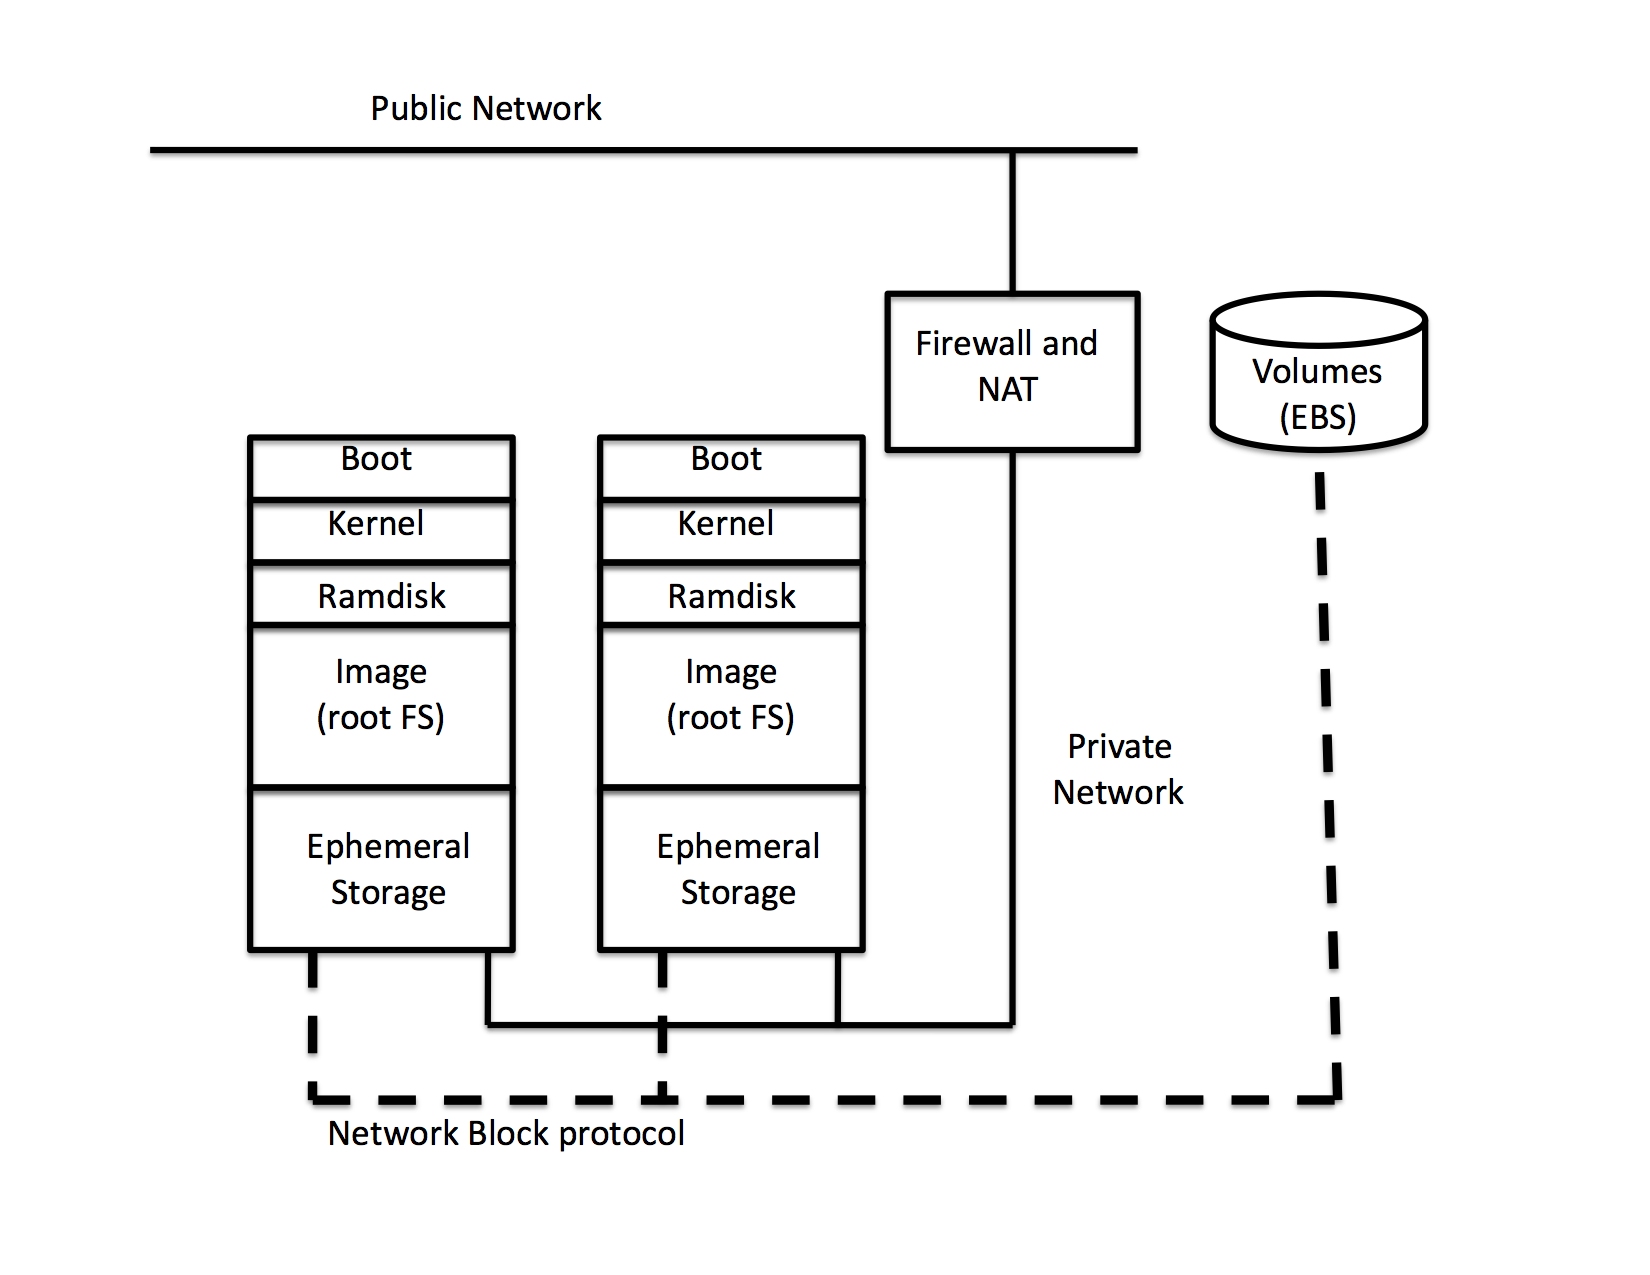
Virtual Machines
Linux virtual machines, under AWS, are called instances. Each instance consists of a
- boot record
- kernel
- ramdisk
- image (root file system for Linux)
- ephemeral disk storageFor windows, it is slightly different in that the kernel and ramdisk are combined, but logically the components needed are equivalent.
Typically, the functionality that is associated with the virtual machine (VM) is defined by the image. For Linux, the image contains a single root file system which usually holds a specific version of a specific distribution (e.g. CentOS 6.4.1, Ubuntu 12.04, etc.) The kernel and ramdisk that are loaded with the image into the instance must be compatible with the image, and the boot record is one that the hypervisor must understand. Amazon installs the kernels, ramdisks, and boot records for the images it makes available publicly. It is also possible for users to upload their own images, and (using a paravirtualized boot loader) their own kernels and ramdisks.
To see what images are available on AWS, set the REGION variable in the file shown above (I’m using us-west-2 in this example) and type
euca-describe-images -a
It will take a while but you’ll get back a lengthy listing of the images that are installed and publicly available. Now try
euca-describe-images -a | grep ami-f33fa9c3
You should see something that looks like
IMAGE ami-f33fa9c3 ubuntu-us-west-2/images/ubuntu-precise-12.04-amd64-server-20130516.manifest.xml 099720109477 available public x86_64 machine aki-fc37bacc instance-store paravirtual xen
From the name, this image (identified by its AMI ID ami-f33fa9c3) is an Ubuntu 12.04 image compiled for 64 bit. Notice that it specifies a kernel ID: aki-fc37bacc. Checking the image catalog with
euca-describe-images -a | grep aki-fc37bacc | grep -v ami-
the kernel is a custom kernel (contained in the image’s /boot directory) that is accessed vi PV_GRUB.
IMAGE  aki-fc37bacc
ec2-public-images-us-west-2/pv-grub-hd0_1.03-x86_64.gz.manifest.xml amazon available    public  x86_64  kernel              instance-store paravirtual  xen
Instances
When an instance is instantiated from an image it is booted on a hypervisor and attached to a private network that is protected by a firewall and a NAT (Network Address Translation) gateway. It also need to have some form of external access enabled (typically ssh). Thus running an instance for the first usually time involves
- booting an instance from an image
- opening the ssh port in the firewall
- telling AWS to insert the public key of a public-key/private key pair for sshIn addition, you need to select the “size” of the instance to boot from the set of available Instance Types. Each type specifies the amount of memory, the number of cores, and the size of the ephemeral disk that the instance will be given when it boots. Thus running an instance boots an image with the resource specified in the instance type, on a private network. Each instance type carries its own hourly charge so you need to be careful about which ones you choose.
To get the instance running, you first need to ask AWS to create an ssh keypair, the public end of which it will inject for you into the instance should you so choose. The command to create a key pair is
euca-create-keypair -f keyfile keyname
Where keyfile is the name of a file you want to use to hold the private key and keyname is the name of the key pair. AWS associated the name “keyname” with the public key so that you can refer to it in the launch command as a way of instructing it to inject the public key into the instance. For example, the command
euca-create-keypair -f testkey testkey
creates the keypair called “testkey” in AWS and writes the private key into the file testkey in the local directory.
To launch an instance, you must specify (at a minimum) the ami ID and the key name. In addition, you should specify the instance type (there is a default but it may be more expensive than you’d like).
euca-run-instances ami-f33fa9c3 -k testkey -t m1.small
Launches the Ubuntu image described previously with the testkey keypair as an m1.small instance. When the instance boots, your account will be charged $0.10$ for each hour (or fraction of an hour) it uses.
It takes some time to start an instance. Before the instance is ready, it will show up as having a status of “pending”
INSTANCE i-75ade57d ami-f33fa9c3 ip-172-31-1-172.us-west-2.compute.internal pending testkey 0 m1.small 2014-04-23T20:11:35.000Z us-west-2c aki-fc37bacc monitoring-disabled 172.31.1.172 vpc-94ad41f1 subnet-d5467793 instance-store paravirtual xen sg-b07fb3d5 default false
To check its status you must poll the system:
euca-describe-instances
and wait for the status to become running. When it shows as running the instance is booted and the ssh key has been inserted so that you can log in.
Also notice that the instance has been give an instance ID that begins “i-“: i-75ade57d. You’ll need this ID to reference the instance in other commands. It is always available from describe instances.
However you first need to open the ssh port in the firewall. In this example, because I didn’t specify otherwise, AWS chose the default security group for the instance. Each security group corresponds to a separate, isolated private network with its own firewall and NAT. It is possible to create different security groups (and to give them names) with the euca-create-group command. If you don’t specify a name to the run instance command, however, it will choose the security group with the name “default.”
To open the ssh port in the default security group, run
euca-authorize default -P tcp -p 22 -s 0.0.0.0/0
At this point you should be able to ssh into the instance using the private key returned by AWS when you created the keypair.
ssh -i ./testkey [email protected]
Notice in the display from describe instances show above that the instance has both an external DNS name (ec2-54-187-86-32.us-west-2.compute.amazonaws.com) and an internal DNA name (ip-172-31-1-172.us-west-2.compute.internal). Only the external one is accessible from outside the firewall (it is NATted to the internal address and name). Also notice that I had to log in as the user “ubuntu.” The key insertion mechanism for this image enables the user ubuntu rather than the user “root” by default. The ubuntu user is sudo enabled, however, so you have root access to this instance.
To terminate the instance (thereby causing AWS to cease charging you) run
euca-terminate-instances "i-75ade57d"
You may need the quotes to avoid the shell parsing the “-“ in the ID.
Instance Impermanence
Once of the curious aspects of the AWS cloud model (and, since it has influenced all of the others, we can “cloud computing” in general) is the difference between an instance and a VM in terms of permanence. A VM is intended to function as a “virtual” piece of hardware typically called a “server.” When a VM boots it is analogous to turning the sever on. When it shuts down, the model (typically) is that of turning a server off. The VM is assumed to be permanent (like a server) while it goes through its power up/power down life cycle.
Instances are different in that they are temporary running versions of images (at least, they were in their first incarnation – see below). The designers of AWS believed
- each instance should start from a known state
- the infrastructure is robust enough to make instance failure rare
- well written applications need to be prepared for catastrophic instance failureFor these reasons, instances have the property that they always start from the state that their image was in when it was registered with the cloud, and then they are terminated, all of the state changes that were made while they were running are lost.
This property (which is actually quite a useful property when operating at scale) is the biggest source of confusion for most cloud users, especially those familiar with VMs and virtualization. When an “regular” instance is terminated, everything in the instance is deleted permanently. It feel strange because when he instance boots, there is a root file system that is readable and writable and also “ephemeral” disks that are empty but formatted as file systems that appear ready for use. Anything written to the root file system or the other ephemeral partitions while the instance is running is simply lost.
For example, logging into an Ubuntu 12.04 instance run as an m1.small instance type, a df shows
ubuntu@ip-172-31-7-74:~$ df
Filesystem     1K-blocks   Used Available Use% Mounted on
/dev/xvda1      10321208 796228   9000704   9% /
udev              838184     12    838172   1% /dev
tmpfs             338516    168    338348   1% /run
none                5120      0      5120   0% /run/lock
none              846284      0    846284   0% /run/shm
/dev/xvda2     153899044 192068 145889352   1% /mnt
The instance type claims that, for an m1.small, the instance gets 1 disk of 160 GB. The Ubuntu distribution is on the 10 GB root file system and the 153 GB partition mounted on /mnt is formatted as an ext4 file system. Any file written to the root file system or the file system mounted on /mnt will be lost when the VM terminates.
Elastic Block Store: Persistent Volumes
The ephemeral nature of instances requires that the user take steps to store data that must persist across instance creation and termination in some form of persistent storage. Originally, there was only S3. The model was to load from S3 all data that the instance needed just after it booted (sometimes as part of its /etc/rc processing) and then to explicitly store back to S3 any data that needed to persist after the instance shut down. This load/checkpoint model proved too cumbersome for many to use effectively. Further, it can be time consuming (although not expensive since Amazon does not charge for the bandwidth used between EC2 and S3) as the fetch and put are not differential (although several clever systems were developed to alleviate this last problem).
It is still possible to use S3 as an explicit storage facility for instance persistent data, but Amazon now includes a persistent storage volume facility called the Elastic Block Store (EBS).
EBS volumes are essentially persistent disk partitions that can be created and destroyed dynamically under user control. Because they are logically not part of the instance, they must be attached to an instance before they are used and detached when they are no longer needed. terminating an instance automatically forces a detach.
To create a volume, you must specify the volume size (in GB) and an availability zone for the volume. EBS volumes can only be attached to instances running in the same availability zone.
Returning to the example, I started another instance let Amazon choose an availability zone for my instance start. It chose us-west-2c.
INSTANCE i-c4c68ecc ami-f33fa9c3 ec2-54-187-111-144.us-west-2.compute.amazonaws.com ip-172-31-7-74.us-west-2.compute.internal running testkey 0 m1.small 2014-04-23T23:00:42.000Z us-west-2c aki-fc37bacc monitoring-disabled 54.187.111.144 172.31.7.74 vpc-94ad41f1 subnet-d5467793 instance-store paravirtual xen sg-b07fb3d5 default false
To create a 10 GB volume that this instance can access, then
euca-create-volume -s 10 -z us-west-2c
The return message has the status of the volume as creating. Before the volume can be attached its status must go to available.
euca-describe-volumes
polls the status.
VOLUME vol-7443fb78 10 us-west-2c available 2014-04-23T23:13:41.660Z standard
Now it is possible (using the instance ID) to attach the volume. You need to specify the device name in the instance to use (/dev/xvdb in this example – note that in the df AWS has used xvda for its root and ephemeral).
euca-attach-volume -i i-c4c68ecc -d /dev/xvdb vol-7443fb78
Now poll again to wait until the attachment completes
VOLUME vol-7443fb78    10      us-west-2c  in-use 2014-04-23T23:13:41.660Z standard
ATTACHMENT  vol-7443fb78    i-c4c68ecc  /dev/xvdb   attached 2014-04-24T00:10:13.000Z
At this point it is possible to log into the instance, mount the volume (it will appear in the instance as /dev/xvdb) and to format it as a file system. Once formatted (you only need to do this the first time after the volume has been created) the volume can be mounted as if it were a formatted disk partition.
Before terminating, it is best to unmount the volume. Linux will try and flush the buffer cache and do an unmount as part of the terminate but there is no guarantee that the flush will be complete before the detach forced by AWS takes place. Detaching a mounted volume can cause data corruption so you should unmount before detaching and/or terminating to be safe.
Having done that, however, data in that volume will persist past the termination of a an instance. If you were to write some data into the volume, unmount it, detach it, and terminate the instance. Then start another instance (it can even be from a different image as long as it recognizes the file system you put on the volume when you formatted it) attach the volume and mount it and the data will still be there. The EBS volume behaves like a portable disk that you can “plug” into an instance once it is running.
Note that each EBS volume can be plugged into at most one instance at a time. It is not a file sharing protocol (which is another point of some confusion).
Why?
Returning to the figure, the volume itself is housed in some storage facility within AWS (it is not part of the instance). To access it, disk block requests are encapsulated in network packets and sent across a network link to the network-attached device that is serving the volume. Amazon does not say much about how EBS is implemented. For example, it is not clear whether the EBS block traffic goes over the same network interface that the instance traffic uses. It also isn’t clear whether the packet format is IP. Logically, though, the architecture is analogous to using iSCSI to encapsulate disk block traffic in IP packets.
Thus, the protocol is between a single disk block device and a storage device – EBS is not a file system. In the same way that two machines cannot have the same disk plugged into them, two instance cannot both attach an EBS volume.
However, it is possible to format an EBS volume as a file system and then to use a network file system (within the instances) to share it. One common set up that is used to share an EBS volume is to mount it in an instance and then have the file system exported as a NFS share to other instances.
Completing the Instance Story
Just to make things more convenient (and confusing) it is possible to use an EBS volume as the backing storage for an instance. That is, in the original conception of an instance provided above, the storage for the instance is dynamically allocated when the instance is started and and released when the instance terminates. This is now called an “Instance Store” instance. An “EBS-backed Instance” is one in which the root file system containing the image is stored in EBS. In the describe images output, the image is tagged as either being an ebs instance (or not, implying that it is an instance store instance).
The advantage of an EBS-backed instance is that the root file system can be made to persist across instance terminate, but in kind of a funny way. First, for EBS-backed instances it is possible to issue a STOP command. Stopping such an instance also stops AWS’s charging for it but it does tell AWS to reclaim the root file system space. Thus, creating an EBS-backed instance and then stopping it, is like terminating but without the loss of the contents. To get it back, you issue a START command.
If you terminate an EBS-backed volume, the default action is to delete the root volume. You can override this behavior. If you do, the volume will be detached but it will remain available (and you will be charged for its storage). You can mount the volume in another instance (like any other volume) but you can’t restart an instance from it directly.
Instead, to restart from a volume that has persisted past the termination of an instance, you need to take a snapshot of it and register the snapshot as a new image. In effect the snapshot-register operations reconstitute the root file system with the exact contents it has when the instance detached it.
Networking
The networking model supported by AWS in general, and EC2 in particular, can also a source of some confusion. Each instance must be assigned to a security group. Security groups are created by the user using the create group command:
euca-create-group cs290b -d rich-test-group
Note that the “-d” flag which allows you to add a description of what the group is for is not optional. AWS will assign an internal name to the security group that begins “sg-“ but you can use the name you’ve given the group instead to launch an instance. So a describe groups
euca-describe-groups cs290b
takes your name and returns
GROUP  sg-f64f9a93 932234911131    cs290b  rich-test-group vpc-94ad41f1
PERMISSION  932234911131    cs290b  ALLOWS  -1          TO CIDR 0.0.0.0/0   egress
Each security group is logically a firewall behind which the instances that are in the group are placed in terms of networking. Thus launching an instance in this group:
euca-run-instances ami-f33fa9c3 -k testkey -t m1.small -g cs290b
with the “-g” option tells AWS that an instance should be started and the firewall rules for the instance should be those associated with the security group “cs290b.”
In the default configuration (without the use of the AWS VPC facility) each instance gets one network interface on a private network that the security group controls. All instances in the same security group are on the same private network and, thus, can communicate without regard for the security group rules. Instances in other security groups or network connections outside of AWS are subject to the security group’s filewall rules.
To enable ssh (as we did for the default group in the previous example)
euca-authorize cs290b -P tcp -p 22 -s 0.0.0.0/0
After which, the decribe for the group shows
GROUP  sg-f64f9a93 932234911131    cs290b  rich-test-group vpc-94ad41f1
PERMISSION  932234911131    cs290b  ALLOWS  tcp 22  22  FROM CIDR   0.0.0.0/0   ingress
PERMISSION  932234911131    cs290b  ALLOWS  -1          TO CIDR 0.0.0.0/0   egress
Each instance gets an internal IP address on the private network and an internal DNS name. It also gets an external IP address and external name installed on the firewall/gateway associated with the security group.
When two instances communicate, they should use their internal addresses. If they do not, the traffic will need to traverse some gateway within AWS and doing so affects network performance. For this reason, the DNS that Amazon operates inside AWS uses a split-horizon model in which DNS names resole to their internal addresses from within AWS but the external name will resolve to the external IP address from outside AWS.
Also notice that an instance doesn’t have a way to discover its external IP address or DNS name using normal Linux tools. For example, a call to ifconfig returns the private IP address associated with the instances interface and a DNS lookup on the external name (as described in the previous paragraph) also returns the private IP.
For example, an instance described as
INSTANCE i-bfaa7eb7 ami-f33fa9c3 ec2-54-187-63-154.us-west-2.compute.amazonaws.com ip-172-31-24-67.us-west-2.compute.internal running testkey 0 m1.small 2014-04-25T16:56:45.000Z us-west-2b aki-fc37bacc monitoring-disabled 54.187.63.154 172.31.24.67 vpc-94ad41f1 subnet-062a3c72 instance-store paravirtual xen sg-b07fb3d5 default false
yields
eth0      Link encap:Ethernet  HWaddr 06:95:3e:09:4b:4a
          inet addr:172.31.24.67  Bcast:172.31.31.255  Mask:255.255.240.0
          inet6 addr: fe80::495:3eff:fe09:4b4a/64 Scope:Link
          UP BROADCAST RUNNING MULTICAST  MTU:1500  Metric:1
          RX packets:281 errors:0 dropped:0 overruns:0 frame:0
          TX packets:252 errors:0 dropped:0 overruns:0 carrier:0
          collisions:0 txqueuelen:1000
          RX bytes:32703 (32.7 KB)  TX bytes:27826 (27.8 KB)
          Interrupt:27
from ifconfig. Notice that the public IP address is not listed.
To resolve this problem, Amazon operates a web service at an unroutable IP address called the metadata service. Its address is 169.254.169.254 and a wget from this service will return “metadata” for the instance making the call. One of the entries in the metadata service (among many) is the public IPv4 address that is visible externally.
For example,
wget 169.254.169.254/latest/meta-data/public-ipv4
for the instance described above yields 54.187.63.154.
Comments